I’ve seen a lot of different versions of this “string art”.
My sister has even made one! I wasn’t overly interested in making one until I
found today’s Pinspiration. As you can tell by the picture, there isn’t a ton
of string, so I figured I’d be able to handle it! Ha!

So here’s what you’ll need:
1 Square piece of wood (here-I have the 9x12)
Nails (here)
Wire String (here)

Since the picture I found was actually available for purchase,
it doesn’t link to someone showing you how to make this. So, when I made it, I copied as close
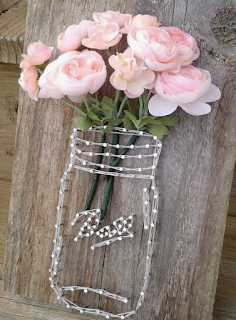
to the picture as I could. Here's what I did: First I marked the wood where I will hammer in the nails. The spacing of the marks are about .5"-1" depending on where in the "jar" it is. The space I'll be using on my piece of wood is about 8.5"x11.5", so I started marking about 5.5" from the top.
In the Pinspiration , there are about 5 “rows” of nails at the top, unevenly spread apart, so don’t worry about making this perfect or evenly spread. I ended up only doing about 3 rows, due to the size of my piece of wood. Each nail is about .5"-1" and I used about 17 nails in total in this section. This is the part on a mason jar where you would screw the lid on, so those lines should actually be moving down, so uneven lines are perfect!

In the Pinspiration , there are about 5 “rows” of nails at the top, unevenly spread apart, so don’t worry about making this perfect or evenly spread. I ended up only doing about 3 rows, due to the size of my piece of wood. Each nail is about .5"-1" and I used about 17 nails in total in this section. This is the part on a mason jar where you would screw the lid on, so those lines should actually be moving down, so uneven lines are perfect!

One the top of the jar was done, I took 8 nails going in a semi-straight line down toward the bottom of the wood. I spaced them about .5" apart.
I used 5 nails to make up the base of the jar. Again, these nails are about .5" apart, connecting each of the "sides of the jar".
To give the jar some depth, I added 4 nails curving
up from the bottom left corner of the “jar”.
Once all the nails were in place, I started in the top left corner with the wire string, by tying one end of
the string to one nail. I cut as much off the extra as I could. Then I brought
the string around each nail heading right. I went around the three rows on the top of the jar before going down the right side, around the bottom and back up the
left side. I did this over the entire “jar” about 3-4 times. Once I had gone about 4 times around the bottom piece, I tied the end to a nail on the top right side. Then I used hot glue to secure it in place and cut off all the extra.


While the glue was drying, I cut the stems of the faux
flowers so they are about 3-3.5" long. Then I used flower tape to hold two stems of the flowers together. Then, I put the flowers between the string and the wood.

And that’s it. This is def one of my more time consuming and
difficult projects. I would clear a few hours for this if you plan on making
one. It
required a lot of patience! But is so worth it!


I love the pink hammer!
ReplyDeleteThanks! My mom got it for me when I went off to college...and I still have it!
ReplyDelete